This is a post about a switch from Wordpress to Jekyll that I decided to make around two months ago. It has taken a while to fully transition to a setup that I am happy about and now I am finally running a Jekyll-based blog, just like all the cool kids seem to be doing these days.
My old Wordpress setup actually goes all the way back to 2009 when I first felt I had a need for a web site to post random stuff. I found a decent web host that provided PHP support for a cheap price so I could run Wordpress – that seemed like the best solution back then. The hosting stayed fairly cheap but the support declined in quality and various small issues started appearing. I was fed up with this solution and started looking for an alternative solution.
Around the same time I started playing around with Amazon Web Services. The offer of a one year free-tier (an almost free micro instance) got my interest and I started using this for hosting some private Git repositories. I did some tests running a webserver on the same instance and it seemed to work well enough, so last year I decided to finally leave my old hosting provider and transfer the site to my AWS instance.
It turned out that the Wordpress setup didn’t actually perform too well on the micro instance. Not too much worse than the previous hosting provider but still enough that it felt kind of sluggish.
Somehow Jekyll caught my attention around this time and I was sold on the idea pretty much immediately. I would still recommend Wordpress to anyone who needs a nice user interface and editor, and is not really too comfortable with editing Markdown files. But for someone who prefers Markdown to WYSIWYG editors, a generator like Jekyll is really the perfect tool. I can use Git to manage this website now, instead of going through a clunky web interface and having to deal with constant updates that need to be applied. And best of all, the blog has gone from being sluggish to lightning fast.
Exporting Wordpress
I exported the Wordpress site from within the web interface and got an XML
dump. This can be converted directly into a Jekyll site using the
jekyll-import gem. This post was helpful in explaining the process in more detail. The
import went smoothly, though the resulting files are all in HTML format. I
had to clean the files up a little bit, particularly pages with inline
images. Some pages I decided to convert to Markdown immediately since I know
I will have to keep them updated in the future.
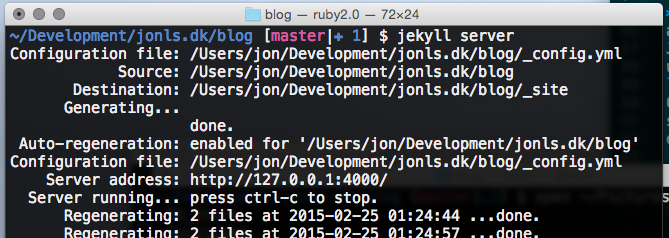
One of the best things about Jekyll is the jekyll serve command that will
run a local web server providing a preview of the generated files. It also
automatically regenerates the site whenever a file is modified, so it makes
testing out a lot of little changes to the site a breeze. No more trying to
set up an exact replica of the web server PHP environment to test out
something.
Running the web server
I had the Wordpress site served by an Nginx server since Nginx seems to be a popular choice for low-performance environments like the Amazon micro instances. Serving a static site is somewhat easier to set up though. Some specific things that I set up using the Nginx configuration includes:
- Enable gzip compression of HTML/CSS/Javascript.
- Rewrite rules to remove
index.htmlfrom URLs so that access to/path/index.htmlredirects to/path/. I don’t want the URL with theindex.htmladded to be a valid URL. - Rewrite the old Wordpress
/feed/URL to/feed.xml. I made this a301 Moved Permanentlyso hopefully feed readers will catch on to this change automatically. From a quick survey of my logs it seems that not all do though. - Enable caching headers. Since usually only HTML pages will change on
a static site, everything else can be cached very aggresively. CSS and
Javascript files can also be cached very aggresively if cache busting is
used. This can be done in Jekyll simply by appending
?v={{ site.time | date: "%s" }}to the URL of any CSS or Javascript files that are loaded. The downside of this simple solution is that it will bust the cache every time the site is changed even if the CSS/JS did not change.
At this point in the process I really just wanted to boot up a new AWS instance and install the web server, test and tweak the configuration to my liking, and then change the DNS entries to this new instance. However, I still had the Git server running on the old instance and I didn’t really have an automated way of migrating that to a new instance.
Ansible + Vagrant
I have started using Ansible lately for some other maintenance tasks and I have found it to be a very easy way of defining the desired environment on servers and workstations. When combined with Vagrant, it makes it extremely easy to build up an environment with Ansible on the virtual machine that Vagrant makes available. This environment can then be tested thoroughly and the Ansible playbook can be applied to the actual server or workstation.
Ansible seems to be targeting situations where many servers have to be managed but I think it can be useful for simple setups like mine. I put together a little Ansible playbook that takes care of installing the right packages, installing the configuration files, and so on.
Building the site automatically
At this point I had two things left that I wanted to incorporate in this setup:
- Automatically rebuild the Jekyll site when the corresponding Git
repository is pushed to. This would make deploying the site a simple
git pushwhich is pretty cool. - I have been hearing about Docker for a while and I was curious what it could be used for, so I decided that purely as a learning experience, I should try to use Docker in this setup.
First, the web server is fairly easy to run in a Docker container. There is an official Nginx docker container and the setup is as simple as mounting the desired configuration file inside the container and connecting port 80 to the outside. I think it would also be possible to create a derived container with the configuration file inside of it but that makes more sense when you have to deploy the same setup to multiple servers.
The next part is little bit more tricky. I wanted to run jekyll build in
response to a git push to the server so obviously I would need a hook in
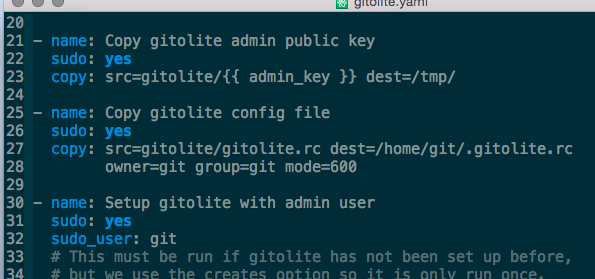
the Git repository. I am using Gitolite to manage
the Git repositories and it allows me to easily define a post-receive hook
which is the hook that should be used for this kind of thing.
I considered a few different solutions for what to actually do with the Git
hook. The most simple solution would be to just run the Jekyll build right
there from the Git hook but then the git user needs write access to the
web server directory and that feels wrong. I would probably have gone for
this solution if I had not already decided that I wanted to see what Docker
could do. Instead I decided to go for a more flexible setup.
I started up a RabbitMQ container and wrote a
small post-receive hook to send a message to the RabbitMQ process. Using
Gitolite, I installed this hook as the default hook for all my Git
repositories. This means that I can now simply subscribe to RabbitMQ if I
want to react to any push to my Git repositories.
Jekyllbuilder
Next, I created a Docker container that links to the RabbitMQ container, listening for pushes to the Jekyll site repository. When a push is detected, the repository is cloned and the site is rebuilt. I call this the Jekyllbuilder. There is also a prebuilt docker image at the Docker Hub. This container can easily be linked to RabbitMQ container and at the same time it can import the volume from the Nginx container, making it possible for the Jekyllbuilder to automatically deploy the newly built site to the web server. I took some inspiration from this JekyllBot for the code.

After putting all of these parts together in the Ansible playbook, it was simple to test it out on a Vagrant box. When I was satisfied, I booted up a new AWS instance, ran the Ansible playbook on that instance, and everything was then ready to go simply by pointing the DNS entries to the new instance.